

Overview
Contributors given access to comment on SpecLink Cloud projects can add comments on any paragraph.
This article covers the following topics:
- View and Filter Comments
- Add a Comment
- Adjust Comment Priority and Status
- Reply to a Comment
- Edit a Comment
- Delete a Comment
- User Tagging and Notifications
- Resolve Comments
- Reject Comments
- Copied Projects & Imported Sections
Click here for information about Generating the Comments Report.
Click here for information about the Comment Mode View in locked sections.
Note, starting in Release 2024.2.0, comment labels have been changed from "Open Comments" to "Active Comments." This term is referring to all comments that are not in "Resolved" or "Rejected" status.
View and Filter Comments
Follow the steps below to view comments to a paragraph.
- Click the "Show Comments" button located in the top right corner of the section.
This button is a toggle so when comments are not being displayed the button will appear grey as pictured above. When the toggle is active and comments are being displayed, the button will appear blue as below.
When viewing a section that already has active comments, a red number will appear to indicate how many active comments are in that section.
Displaying comments will access the comments menu within the specification section.
- Use the Comments menu to select view filters for comments of various priorities and statuses. The Red number to the right of the Comments Menu will indicate how many comments fit the selected filters.
- Once the Comment Filters are visible, click the dropdown arrow for either Priority or Status to view the full list of options. The default filter view is shown below. Currently filtered options can be identified by the checkmark next to them. The "Rejected" and "Resolved" Comment Status are not visible by default.
- The Filters can be toggled by clicking on each option to either add or remove the checkmark. The red number next to the comments menu will update to reflect the current count of comments that match the selected filters.
In the above example, only comments with the "Critical priority" will be shown. The Red Comment Count number has been updated to show there are 2 comments that match the selected priority filters and the selected Status filters.
- Selecting the "All" option at the top of each filter menu can be selected to toggle all filter options on or off.
Add a Comment
Follow the steps below to add a comment to a paragraph.
- Hover the cursor over the right end of the a paragraph.
- Click the "+" sign for adding a comment.
- A window will open providing the ability to add a comment.
- Enter the desired comment and click the Comment button.
The Comments field has a 4000 character limitation.
Adjust Comment Priority and Status
When making a or replying to a comment, priority levels and statuses can be applied. Priority Levels are useful for managing the importance of various comments. Status is useful to communicate the state the comment is in without needing to edit or reply. Both Priority and Status can be filtered to view specific comments to streamline workflow.
Follow the steps below to adjust the priority and status of a comment.
Priority
- After writing a new comment as shown in the steps above in Add a Comment, the Priority can be adjusted by clicking on the small grey oval in the top left of the comments box
- After clicking, the priority dropdown list will appear. The checkmark and bold text shows the current priority level. In the example below, this comments priority is the grey "Not set" level.
- From the list, click on the desired priority level for the comment. The oval in the top right will change to the corresponding color to confirm the Priority Level change has been applied. Opening up the dropdown list again to verify the position of the checkmark is another method of confirmation.
- Save the comment by clicking the blue "Comment" button.
Status
A brief explanation of each of the different comment status options is below, followed by the steps to adjust the status for a comment.
| Status | Description of Comment |
| Draft | Comment currently being written or edited |
| Open | Comment submitted and ready for action |
| Pending | Waiting for a response or action to be taken |
| In Progress | Action has been taken or work has begun |
| Ready for Review | Action/Work finished, resolution pending review |
| In Review | Resolution has been completed and is now under final review |
| Rejected | Proposed resolution has been rejected |
| Resolved | Proposed resolution accepted or all necessary action completed |
- After writing a new comment as shown in the steps above in Add a Comment, the status of the comment can be adjusted by clicking on the Status Dropdown Menu at the top of the comments box.
- After clicking, the Status dropdown list will appear. The checkmark and blue text shows the current Status. In the example below, this comments status is set to "Draft."
- From the list, click on the desired status for the comment. The selected status will display in the next to the dropdown menu.
- Once the status has been selected, save the comment by clicking the blue "Comment" button.
Reply to a Comment
Follow the steps below to reply to a comment.
- Confirm Show Comments is enabled.
- Locate the comment for review and click into the "Type a reply" comment box.
- Begin typing the comment reply. Once begun, the "Reply" and "Cancel" buttons will appear at the bottom of the comment box.
- Click "Reply" when you are done.
- The reply will be added to the comment in a conversation style string as depicted below.
Edit a Comment
Follow these steps to edit a comment or reply.
- Confirm Show Comments is enabled.
- Locate the comment for review and click the pencil button in the top right corner of the comment box.
- After clicking the Edit pencil button, the text box will activate to make any text adjustments. Once edits are complete, click the "Save" button to save the edits.
- If making edits to the Comment Priority or Comment Status, simply follow the steps above in Priority or Status, there is no need to click the Edit pencil button for these changes.
Delete a Comment
Follow these steps to delete a comment or reply.
- Confirm Show Comments is enabled.
- Locate the comment for review and click the Delete/trash can button in the top right corner of the comment box.
- There will be a prompt to confirm if the comment should be deleted. Click Delete again to confirm deletion or Cancel to not delete the comment.
User Tagging and Notifications
By utilizing the '@' symbol immediately before typing a users name in a comment or comment reply, (ex. @Alex), will allow users to tag other users in comments. Once tagged, users will receive notifications automatically within SpecLink Cloud and via email.
User Tagging
When typing a comment, tagging another user starts with an @mention. After typing an '@' (SHIFT+2), a drop-down list will appear with all the potential users connected to the commenters account that are available to be tagged. There are some restrictions on whether a user can be @mentioned or tagged in a comment:
- They must be active users or contributors
- They must have access to the project (if the project is Private or Hidden)
- They must have access to all levels of the section or division
Follow the steps below to tag another user.
- Follow the steps in "Add a Comment" to begin creating a comment in a SpecLink Cloud Section. You can also tag users in comment replies, or while editing existing comments.
- Type an "@" symbol (SHIFT+2), to reveal the user dropdown list.
- From the user dropdown list, click on the name of the user to be tagged in the comment or reply. The users name will appear in blue text in the comment box.
- Once all users are tagged, finish writing the comment and click the blue "Comment" button to save. All tagged users will receive a notification related to the comment.
Notifications
Once @mentioned in a new comment, edited comment, or a comment reply, the tagged user will be receive a notification. There are two types of notifications, a SpecLink Cloud in-app notification and an automated email notification.
The in-app notification system will alert users when they have been mentioned in comments. The notification bell in the top right will display each of the @mentions when clicking to open the menu. Comment notifications will be separated from other notification types, there will be a Comments tab, and an Activity tab for other types of notifications.
The automated email notification will send any tagged user an email with a preview of the comment, as well as information about the associated project, including the priority level.
While the default setting for email notifications is set to On, all users will have the ability to enable or disable the automated email notifications when they are @mentioned in comments, to control whether or not an email is sent.
Users can find this setting from the SpecLink Cloud Dashboard and going to the Settings tab, selecting My Settings, and toggling the Email Notifications option as desired.
Resolving Comments
Follow these steps to close out comments by accepting or resolving them.
- Confirm Show Comments is enabled.
- Locate the comment for review and click the Comment Status dropdown menu.
- From the Comment Status dropdown menu, click on the "Resolved" option near the bottom of the list.
The comment status will be set to "Resolved" to notify anyone reviewing all comments that this comment has been reviewed and resolved.
Depending on the comment view filters, the resolved comment will disappear from view as it is no longer considered an "Active" Comment. In order to view all resolved comments, select "Resolved" to be viewed in the Comment Status filter.
When a comment has been resolved, the comment can be reactivated by clicking the upward arrow chat bubble located to the right of the Comment Status. This will reactivate the comment and set it to the "Open" comment status.
Reject a Comment
Follow these steps to close out comments by denying or rejecting them.
- Confirm Show Comments is enabled.
- Locate the comment for review and click the Comment Status dropdown menu.
- From the Comment Status dropdown menu, click on the "Rejected" option near the bottom of the list.
The comment status will be set to "Rejected" to notify anyone reviewing all comments that this comment has been reviewed and rejected.
Depending on the comment view filters, the rejected comment will disappear from view as it is no longer considered an "Active" Comment. In order to view any rejected comments, select "Rejected" to be viewed in the Comment Status filter.
When a comment has been rejected, the comment can be reactivated by clicking the upward arrow chat bubble located to the right of the Comment Status. This will reactivate the comment and set it to the "Open" comment status.
Copied Sections, Projects, & Imported Sections
When a section or project is copied, there is an option to have all comments or only active comments created in the original included in the copy.
When a section is imported from one project or office master to another, there is an option to have all comments or only active comments created in the original included in the import.
Watch the video below to see the steps of commenting in SpecLink Cloud in action:
Comments
7 comments
So, if I can print/export project notes but I can NOT print/export comments, why would I ever want to use comments?
Project Notes are intended to be directives or best practices, while Comments are questions, conversations, and collaboration. That said, we are exploring the enhancement of printing the comments.
Is there any intention for future updates to allow for printing a report of project comments? It would be useful when collaborating with teammembers.
When the comment is for the top line of a page, it doesn't seem like it can be resolved or deleted as the "resolve" text or the three dots are "underneath" the ruler
Daniel - Thanks for the comment here. I am not able to replicate this issue as described. If you've scrolled up and down in the section and you are still seeing the same issue, please send a screenshot into Support so they can assign a ticket. Thanks!
thanks, below is a screenshot. using Google Chrome.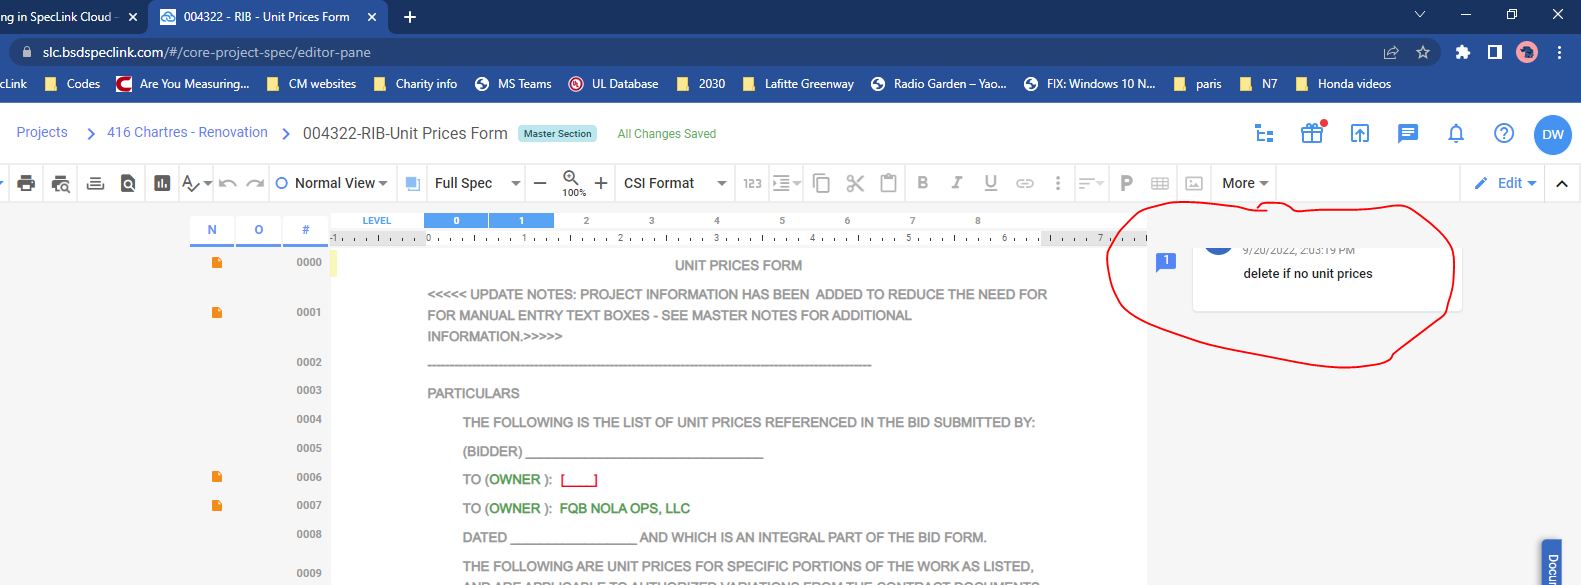
I too have noticed this "glitch" on occasion but not always.
Article is closed for comments.